Izzy Wizzy Lets Get Bezier
This week I’ve been focussed on improving the biometric setup journey for the app that I work on. I’ve taken the opportunity to add a little bit of fun / delight into the setup process and learn more about Animated Vector Drawables in Android.

This post aims to recap what I learned when working with Animated Vector Drawables (AVDs).
There a number of ways to provide animation type effects in Android from simply using what you are given in the Android framework, providing a video, to using the popular Lottie framework by Airbnb. For what I wanted to achieve using a video would be too resource intensive. Plus where was I going to make / get a video from? Also using Lottie would have been a good idea too but I wanted to find some way of doing this on my own using the software I already had. I don’t own any of the Adobe suite. I’m a FOSS kinda guy. So the choice for me was clear, to use what was available out of the box using the Android framework. I already knew that Android had good support for vector graphics and I knew that you could animate vectors very easily, so I set to work.
SVGs And Vectors On Android
Vector graphics are great! They’re tiny, and infinitely scalable. They’re great for icons, especially flat style ones. Android supports a subset of the SVG spec (why a subset - I don’t know but I’m guessing “performance”). If you’re familiar with working with SVGs you should feel comfortable with Android Vectors as the semantics are pretty similar. However that’s like saying, “just use a regular expression”. It’s easier said than done.
So how do SVGs work? Remember those Roamer plotting robots from primary school?
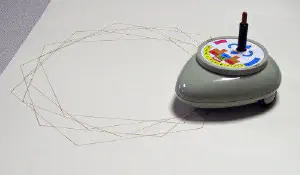
As well as being a fun educational tool they were actually teaching your 6 year old brain about Cartesian coordinate systems and Bézier Curves. Bastards… I know right! That’s all there is to SVGs fundamentally. It’s a language to draw points and curves between them expressed as a set of coordinates and instructions for how to go from point to point. For more (and better information) check out MDNs tutorial on SVGs.
For example if you want to draw a line you would express this in SVG by drawing a path with some start coordinates
followed by intermediate coordinates describing what you want to plot. For example M 10 10 L 90 10 means:
- Start at coordinates (10, 10) - that’s what
Mmeans in (x, y) space. - Draw a horizontal line to the coordinates (90, 10) -
Lmeans Line… duuh.
You can combine these instructions to draw shapes such a square:
<svg>

  <path d="M 10 10 L 90 10 L 90 90 L 10 90 Z"/>

</svg>
Which means:
- Start at coordinates (10, 10).
- Draw a line to the coordinates (90, 10).
- Draw a line to the coordinates (90, 90).
- Draw a line to the coordinates (10, 90).
- Close the path back to your start - that’s what
Zmeans.
Produces a square just like that little robot from primary school!
You can also draw curves using the notation C x1 y1, x2 y2, x y where x1 y1 is the first control point x2 y2 is
the second control point and x y is the end position of the curve. Now this does get a little more complicated but
thankfully it’s about as much as you need to be aware of.
<svg>

  <path d="M 10 10 C 20 20, 40 20, 50 10" />

</svg>
Which means:
- Start at coordinates (10, 10).
- Draw a curve to the coordinates (50, 10).
- Control point 1 is at (20, 20).
- Control point 2 is at (40, 20).
- Make sure the curve passes as close to both control points as possible whilst also ending up at the end coordinate as well as being smooth….. phew!
Produces:
You can hopefully see that drawing this way means that the image size and clarity win big. Text can be compressed a lot more easily than an image and expressing the image in mathematical terms allows for greater scalability. SVGs / vector images are not great for everything so depending on your needs you might still have to use a rastered image.
SVGs can get a lot more complicated and there are different ways to express doing the same thing but they all (pretty much) boil down to this. I’m by no means an expert but armed with this much knowledge I can tackle vectors in Android.
Android Vectors And Animation
The same in Android looks remarkably similar:
<vector xmlns:android="http://schemas.android.com/apk/res/android">

   <path android:name="line" android:pathData="M 10 10 L 90 10 L 90 90 L 10 90 Z" />

   <path android:name="curve" android:pathData="M 10 10 C 20 20, 40 20, 50 10" />

</vector>
Notice that this looks almost identical to the SVG. It would be great if the format was the same but in the grand scheme of things this isn’t too bad. At least we don’t need to embed a vector in a PDF!
Android allows you animate the pathData easily so that you don’t have to worry about animation frames and rendering
and all that complicated stuff. You simply specify where you start from and where you want to end and let Android
(mostly) do the rest. Here’s how you would animate a line to a curve.
<animated-vector
    xmlns:android="http://schemas.android.com/apk/res/android"
    xmlns:aapt="http://schemas.android.com/aapt">
    <aapt:attr name="android:drawable">
        <vector
            android:width="24dp"
            android:height="24dp"
            android:viewportWidth="24"
            android:viewportHeight="24">
            <path
                android:name="line"
                android:pathData="M 10 10 L 90 10 L 90 90 L 10 90 Z" />
        </vector>
    </aapt:attr>
    <target android:name="line">
        <aapt:attr name="android:animation">
            <objectAnimator
                android:propertyName="pathData"
                android:valueFrom="M 10 10 L 90 10 L 90 90 L 10 90 Z"
                android:valueTo="M 10 10 C 20 20, 40 20, 50 10"
                android:duration="300"
                android:interpolator="@android:interpolator/fast_out_slow_in"
                android:valueType="pathType" />
        </aapt:attr>
    </target>
</animated-vector>
Woah! Now that’s got a lot more complicated but it’s not really! It is simply a bunch of files representing a vector drawable and some animations in a single file so that they are encapsulated. Let’s break it down.
The top part of that file is simply the base vector. It simply describes a line. The main portion of that should be familiar from before.
<animated-vector
    xmlns:android="http://schemas.android.com/apk/res/android"
    xmlns:aapt="http://schemas.android.com/aapt">
    <aapt:attr name="android:drawable">
        <vector
            android:width="24dp"
            android:height="24dp"
            android:viewportWidth="24"
            android:viewportHeight="24">
            <path
                android:name="line"
                android:pathData="M 10 10 L 90 10 L 90 90 L 10 90 Z" />
        </vector>
    </aapt:attr>
    ...
</animated-vector>
When an Android build runs the AAPT tool will separate files and replace the data here with references back to those
files. This explains the extra attributes such as aapt:attr name="android:drawable". This tells AAPT that what comes
in-between the tags is a drawable and thus it knows where to place the file and how to treat it. I like to think of
this as resource merging in reverse. This process allows us to specify a single file that is actually a bunch of files.
Of course, you can also specify them separately if you want.
The next part to describe are these extra attributes describing the width and the height as well as something called
viewportWidth and viewportHeight.
<animated-vector>
    ...
        <vector
            android:width="24dp"
            android:height="24dp"
            android:viewportWidth="24"
            android:viewportHeight="24">
            ...
        </vector>
    ...
</animated-vector>
The purpose of these are the same as their equivalents in SVGs. It is to describe the width and height of the image
(duuuh) and also the natural / intrinsic dimensions. If you remember the numbers in the pathData are representations
of a coordinate system. Well, how far to the x direction is 10? How far to the y direction is 90? That’s where
the viewportWidth and viewportHeight come in. A viewport is basically the virtual canvas where the paths are drawn
on. Feel free to adjust the width and height. Don’t mess about with the viewportWidth and viewportHeight
otherwise you’ll have to redo all the numbers in the pathData, which is a pain.
Lastly let’s review the animations:
<animated-vector>
    ...
    <target android:name="line">
        <aapt:attr name="android:animation">
            <objectAnimator
                android:propertyName="pathData"
                android:valueFrom="M 10 10 L 90 10 L 90 90 L 10 90 Z"
                android:valueTo="M 10 10 C 20 20, 40 20, 50 10"
                android:duration="300"
                android:interpolator="@android:interpolator/fast_out_slow_in"
                android:valueType="pathType" />
        </aapt:attr>
    </target>
</animated-vector>
Again, you can reference this in the same file or the separately - AAPT will take care of that for you. Hopefully this
is a self explanatory. The main take away points are:
- Where this animation should run - the
target android:name="line". - What it should do - animate the value from
android:valueFromtoandroid:valueTo. - What the values should be interpreted as -
android:valueType="pathType" - How long it should take -
android:durationthis is in milliseconds.
The last attribute, interpolator isn’t important if you’re starting out. Choose the one above. But it can be very
powerful if you want to control exactly how the animation progresses. The fast_out_slow_in simply means towards the
start of the duration animate through frames quickly but slow down towards the end of the duration. This gives a
pleasant easing effect but there are others described visually on this
page.
And that’s it! You have an Animated Vector Diagram, congrats!
…
…
…
Waiiiiiiiit a second. How do I actually use this knowledge?
Not By Hand
Obviously trying to do this by hand for anything but the most simplest of shapes would be an act of sheer folly. I don’t recommend trying. Figuring out the paths is rather complicated and time consuming. Fortunately there are some good tools / resources to help with this.
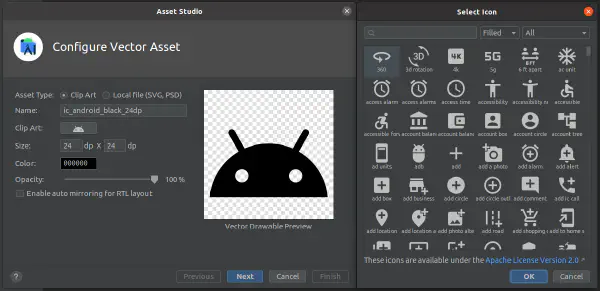
You can source SVGs from many places on the web. For Android I recommend starting at material.io. Here you can find a number of icons in many different formats. You can use them freely as they are licenced appropriately and you can use them on a number of platforms because they have outputs for all the major platforms. You can also get something similar from Android Studio by opening the Asset Studio.
Sadly that’s where good tool integration stops with Android Studio. If you want to do any sort of non minor editing of the vector you’re out of luck. There isn’t an editor apart from the XML editor. That sucks. There are FOSS tools to help you though. Inkscape is a great vector design editor. However the learning curve is pretty steep. You might be like me and install it on every computer you own only to get frustrated and give up. If I keep practising I might get the hang of it but for a one off task it is a bit too much for me to learn.
So what is the tool you need? Shapeshifter by Alex Lockwood. Actually I wish that this was simply integrated into Android Studio. It’s so good!
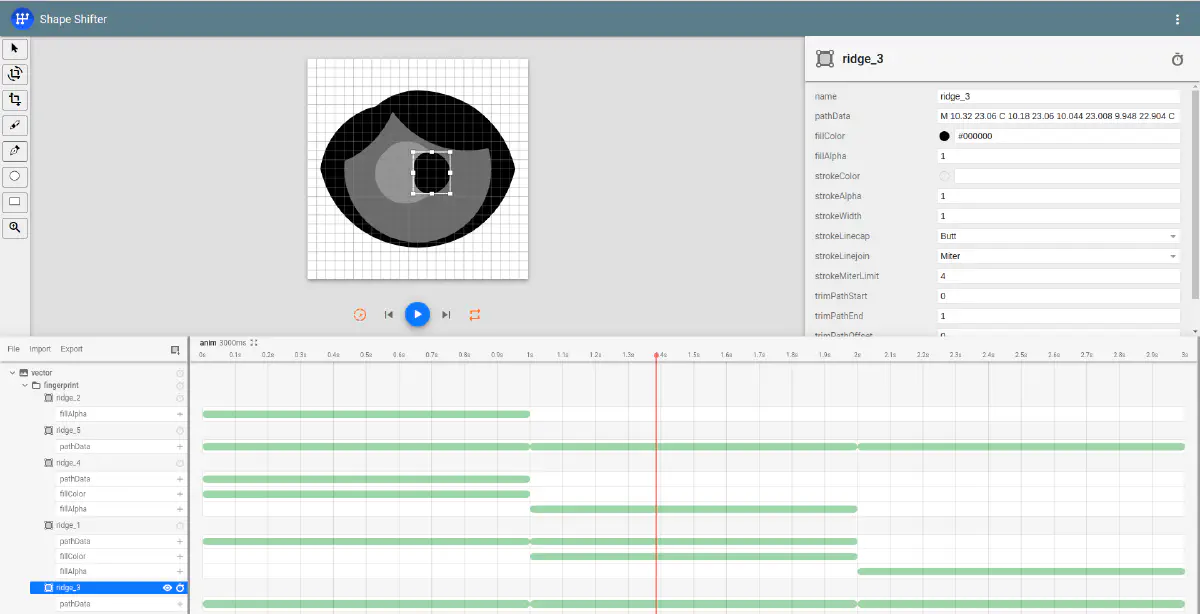
This tool really is amazing! You can edit an SVG / vector on it’s own as well as adding animations in a user friendly way. Best of all is that any issues with incompatible paths or canvases can be auto-fixed from within the tool itself. The best feature from my point of view is that it offers a video editor layout to time the animations. This is super useful when you want to chain one animation next to another. Or run multiple animations at the same time.
When you’re done you simply export the Shapeshifter session to a format that you prefer. It supports SVG, Vector Drawable, Animated Vector Drawable, SVG Spritesheet. So basically if you want to publish to Web or Android. Sorry but for the time being it doesn’t support attaching a vector to a PDF.
Back in Android Studio you now need to set the AVD as the source for an AppCompatImageView. The animation doesn’t
start playing automatically so in order to start you need to get a reference to the Drawable in code and manually call
start. Something like this:
 val avd = binding.imageView.drawable as AnimatedVectorDrawableCompat

avd.start()
And that’s it! You have an Animated Vector Diagram, congrats!
…
…
…
Waiiiiiiiit a second. What do I actually do?
Think Differently
To start with you need to think differently about the creation. Whilst the animation makes everything look fancy you’ll do well to break it down into key parts. For the animation at the top of the post there’s several parts happening. Some of them happen at the same time. This is where Shapeshifter shines because it makes this really easy to manage using the “video editing” layout.
- We start the animation on a vector that represents a fingerprint.
- This is actually broken down in to several paths.
- One for each ridge of the fingerprint.
- This means we can animate them separately.
- It’s a lot of work initially but it makes the process much easier in the long run.
- An animation runs to transform the fingerprint into the face.
- The top ridge morphs into the full circle of the face.
- The ridge below morphs into the central face. This is cleverly shaped to also denoted the hairline.
- The next two ridges morph into the left and right eye.
- And finally the last ridge simply disappears.
- Next, from the face we animate to the eye.
- The circle morphs into the sclera.
- The left eye morphs into the iris.
- The right eye morphs into the pupil.
- And the centre face area simply disappears so that the eye is formed.
- After this comes the HL logo.
- The sclera morphs into the H.
- The pupil morphs into the L.
- The iris disappears.
- Some this is animating from one path to the other and some of it is changing the colour or alpha values appropriately.
- The animation is looped once back to the beginning.
Breaking this down bit by bit makes the animation more manageable. At speed the illusion fools you into thinking it is one seamless transition. Something similar was done for the final fingerprint to tick animation. Although this was much simpler I actually didn’t end up using Shapeshifter for that.
Gotchas
All in all I think this took me about a day to get the basics down and complete and then another full day figuring out small bugs and finer details.
Clip Paths. I don’t understand these. I know it has something to do with excluding areas. Negative shapes, if you will. But I don’t know how I could have used this in this project. Maybe I didn’t need to. Clearly I didn’t.
Tinting. I started off tinting the AppCompatImageView in Android in order to colour it. This worked well until the
animation reached the eye stage and I noticed the sclera was not showing. Tinting was the wrong thing to do for how I
had created these vectors. I know that it should work such that I can simply tint the AppCompatImageView associated
with this drawable for maximum flexibility. In the end I hard coded the colours in the XML of the AVD. Ewww. That
reduces the flexibility if I want to use this is other areas. But I don’t so meh….
The worst part about this process is the really bad APIs for listening to the state of the animation. If you simply want
to start and stop the animation then you’ll be fine. But if you want a callback to notify when the animation starts /
ends so that you can then do something else then the APIs are seriously messed up. Mark Allison explains this much
better than I can in his series Animatable2 part 1 and part
2. Also a big thank you to Nick Butcher’s blog
Reanimation. Both talk about a similar problem in that
even though there is an androidx library for this you can quite easily get caught out and use the wrong API leading to a
full blown crash depending on how your vector drawable was added to the image view. It turns out there are two APIs
that do exactly the same thing but are not compatible with each other at all. To make matters worse different versions
of Android will return you a differently cast Drawable so you have to write a lot of boiler plate to be safe. There’s
some good tips in those blogs but at the end of the day I didn’t think it was worth it. Maybe I’ll write my own
extension function if I can be bothered to hide the complexity. But I feel something like that should really be offered
by the androidx library.
So, yes, you can muddle through it and produce a really cool effect. But it needs to be way easier. That said, just like regular expressions, it does make you look something like a wizard!
