Making A Scene
For the past few weeks I’ve been taking a brief detour into the Transitions framework in Android. I’ve building a success screen that initially shows a full screen image and text and later transitions into a summary of your transaction.
This post documents some of the things I’ve learned whilst working on this.
Some of the transitions that are available on Android are amazingly nice and the default auto transitions are pleasing and useful for the vast majority of use cases. For finer grain control over the transitions you can make use of TransitionSets to build up a set of Transitions that you can customise all you want. The Support Library does a very good job to bring these to earlier versions of Android however if you really want all the bells and whistles you need to specify a minimum API level of 21. If only we could all be so lucky!! For those of us that can’t easily do that there is the fantastic TransitionsEverywhere library that brings a subset of the transitions down to APIs below 21. This gives you more than what the support library does but doesn’t unlock the really neat Activity and Fragment Shared Element Transitions.
For the transition in the video above I started off using the TransitionsEverywhere library but I think it is fair to say that you can achieve the same using just the Android Support Library.
So let’s get into the code!
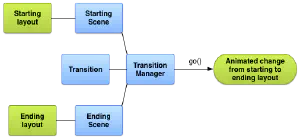
The basic idea is as follows

You declare a starting scene (either declaratively or in code), an end scene (either declaratively or in code), a transition (either declaratively or in code), and finally tell a TransitionManager to change between the scenes using the transition.
The magic happens in a layout that contains a scene_root that in turn contains a placeholder for the scenes that swap
in and out. Here’s what the above looks like:
<?xml version="1.0" encoding="utf-8"?>
<android.support.constraint.ConstraintLayout
    xmlns:android="http://schemas.android.com/apk/res/android"
    android:layout_width="match_parent"
    android:layout_height="match_parent"
    android:fitsSystemWindows="true">

    <FrameLayout
        android:id="@+id/scene_root"
        android:layout_width="match_parent"
        android:layout_height="match_parent">

        <include layout="@layout/scene_a"/>

    </FrameLayout>

</android.support.constraint.ConstraintLayout>
Notice that there is a view with an id called scene_root that includes, initially, the layout for scene_a.
Here’s what Scenes A and B look like in code:
<?xml version="1.0" encoding="utf-8"?>
<android.support.constraint.ConstraintLayout
    xmlns:android="http://schemas.android.com/apk/res/android"
    xmlns:app="http://schemas.android.com/apk/res-auto"
    android:id="@+id/scene_container"
    android:layout_width="match_parent"
    android:layout_height="match_parent">

    <android.support.v7.widget.Toolbar
        android:id="@+id/toolbar"
        android:layout_width="0dp"
        android:layout_height="0dp"
        android:background="?attr/colorPrimary"
        android:minHeight="0dp"
        android:backgroundTint="@color/colorAccent"
        app:layout_constraintLeft_toLeftOf="parent"
        app:layout_constraintRight_toRightOf="parent"
        app:layout_constraintTop_toTopOf="parent"
        app:titleTextColor="@android:color/white">

    </android.support.v7.widget.Toolbar>

    <include
        android:id="@+id/hello_world"
        layout="@layout/hello_world"/>

</android.support.constraint.ConstraintLayout>
And for completeness here is the hello_world layout:
<?xml version="1.0" encoding="utf-8"?>
<android.support.constraint.ConstraintLayout
    xmlns:android="http://schemas.android.com/apk/res/android"
    xmlns:app="http://schemas.android.com/apk/res-auto"
    android:background="@color/colorAccent"
    android:layout_width="match_parent"
    android:layout_height="match_parent">

    <ImageView
        android:id="@+id/imageView"
        android:layout_width="100dp"
        android:layout_height="100dp"
        android:src="@drawable/ic_adb_black_24dp"
        app:layout_constraintBottom_toTopOf="@+id/answer_text_view"
        app:layout_constraintLeft_toLeftOf="parent"
        app:layout_constraintRight_toRightOf="parent"
        app:layout_constraintTop_toTopOf="parent"
        app:layout_constraintVertical_chainStyle="packed"/>

    <TextView
        android:id="@+id/answer_text_view"
        android:layout_width="wrap_content"
        android:layout_height="wrap_content"
        android:layout_marginTop="24dp"
        android:clickable="true"
        android:text="Hello World!"
        app:layout_constraintBottom_toBottomOf="parent"
        app:layout_constraintLeft_toLeftOf="parent"
        app:layout_constraintRight_toRightOf="parent"
        app:layout_constraintTop_toBottomOf="@+id/imageView"/>


</android.support.constraint.ConstraintLayout>
Further points to notice are the differences between Scene A and Scene B, chiefly the hello_world layout. Also notice
that both Scene A and B have a top level layout with an id of scene_container. When the transition runs the
TransitionManager calculates the start and end points represented by the two scene layouts and figures out what has
changed and then uses an animation to animate the difference.
Now that everything has been defined we need to tell Android to actually do something on an event. Here’s what this looks like in Java code:
package uk.co.mezpahlan.sceneexample;

import android.os.Bundle;
import android.support.v4.content.ContextCompat;
import android.support.v7.app.AppCompatActivity;
import android.support.v7.widget.Toolbar;
import android.transition.Scene;
import android.transition.TransitionManager;
import android.view.View;
import android.view.ViewGroup;
import android.view.Window;
import android.view.WindowManager;

public class MainActivity extends AppCompatActivity {

    private Scene sceneA;
    private Scene sceneB;
    private ViewGroup sceneRoot;

    @Override
    protected void onCreate(Bundle savedInstanceState) {
        super.onCreate(savedInstanceState);
        setContentView(R.layout.activity_main);

        sceneRoot = (ViewGroup) findViewById(R.id.scene_root);
        sceneA = Scene.getSceneForLayout(sceneRoot, R.layout.scene_a, this);
        sceneB = Scene.getSceneForLayout(sceneRoot, R.layout.scene_b, this);

        sceneA.setEnterAction(new Runnable() {
            @Override
            public void run() {
                Window window = getWindow();
                window.addFlags(WindowManager.LayoutParams.FLAG_DRAWS_SYSTEM_BAR_BACKGROUNDS);
                window.clearFlags(WindowManager.LayoutParams.FLAG_TRANSLUCENT_STATUS);
                window.setStatusBarColor(ContextCompat.getColor(getApplicationContext(), R.color.colorAccent));
                sceneA.getSceneRoot().findViewById(R.id.hello_world).postDelayed(new Runnable() {
                    @Override
                    public void run() {
                        TransitionManager.go(sceneB);
                    }
                }, 2000L);

            }
        });

        sceneB.setEnterAction(new Runnable() {
            @Override
            public void run() {
                Window window = getWindow();
                window.addFlags(WindowManager.LayoutParams.FLAG_DRAWS_SYSTEM_BAR_BACKGROUNDS);
                window.clearFlags(WindowManager.LayoutParams.FLAG_TRANSLUCENT_STATUS);
                window.setStatusBarColor(ContextCompat.getColor(getApplicationContext(), R.color.colorPrimaryDark));

                final Toolbar toolbar = (Toolbar) findViewById(R.id.toolbar);
                toolbar.setTitle("Well Done!");
                setSupportActionBar(toolbar);

                sceneB.getSceneRoot().findViewById(R.id.continue_button).setOnClickListener(new View.OnClickListener() {
                    @Override
                    public void onClick(View v) {
                        TransitionManager.go(sceneA);
                    }
                });
            }
        });

        sceneA.enter();
    }
}
In this file we can see that references to the scene layouts in Java code in a similar way that you find references to
views with findViewById. Also we have a definition of what will happen when each Scene is entered. This includes some
initialisation logic. Finally we tell Android to start with Scene A.
That’s it! It is very simple to define transitions in this way. As I pointed out earlier this isn’t the only way that you can define transitions. You can also define transitions via XMLs or start and end positions via code depending on your needs. For now I will stick to defining transitions in the way I have described above as I typically want to define them in terms of start and end layouts rather than some dynamic logic at runtime.
Anyways, happy transitioning!